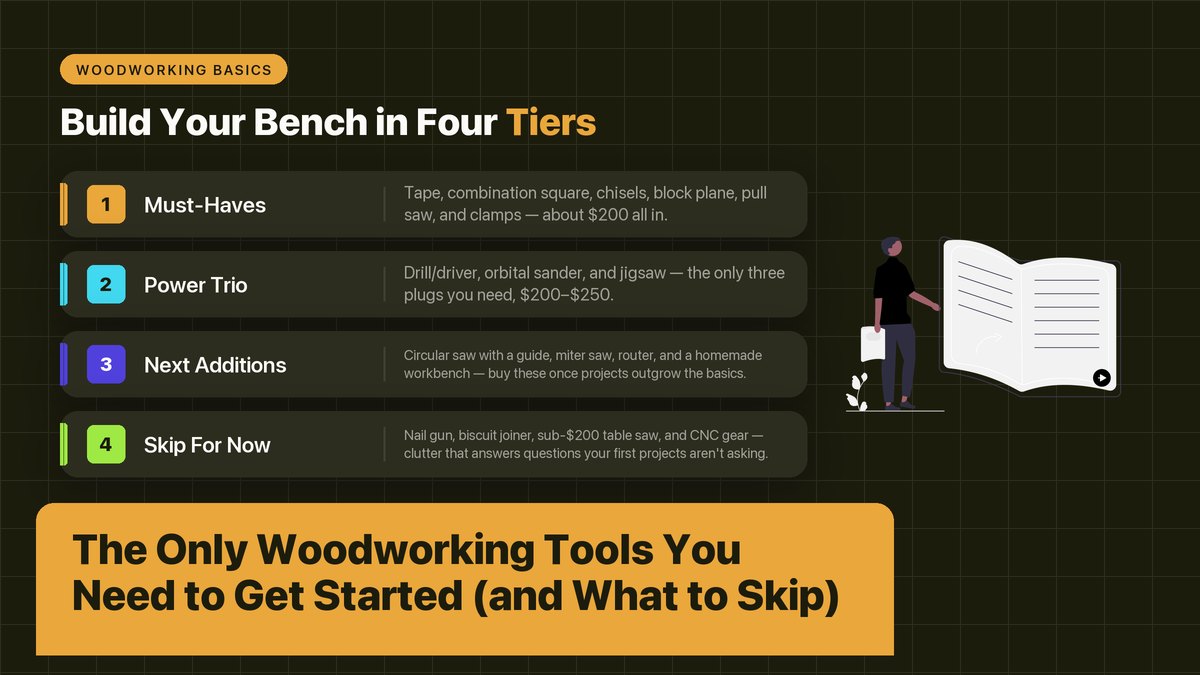
A short list of hand tools, one sturdy workbench, and three power tools will carry you through your first two years of projects. Everything else can wait. This guide covers what each tool is actually for, what it should cost, and which “essentials” deserve a hard pass.
My first workshop was the back corner of a rented garage in Ohio, and I furnished it badly. I dropped $480 on a compound miter saw because a YouTube channel called it the heart of any shop. It sat on a folding table and collected dust for a year. Meanwhile the $14 block plane I almost left at the store got pulled out almost every single weekend, because my early projects needed trimming and fitting far more than they needed perfect crosscuts. I’ve since helped three friends set up their first benches, and the same mistake shows up every time. Beginners don’t need more tools. They need the right dozen. The trouble is that most tool lists get written by people who already own everything, so the lists slowly turn into wish lists. This one won’t. Below is the small set of tools that earn their keep from day one, the handful worth adding once your projects grow teeth, and the clutter I’d tell you to skip even when it’s on sale. Most of this cost me real money to learn. One lesson cost me a layer of skin off my thumb. Take the shortcut instead.
Start With the Pencil: Measuring and Marking
About $60 total for the whole layout kit
Every cut in woodworking happens twice. First on your pencil line, then on the wood, and only one of those is easy to undo. Layout tools decide whether the line is right, which is why this is where your money goes before any blade ever spins.
Begin with a 25-foot tape measure that has a wide blade, an inch and a quarter or more. The fat blade stands out around eight feet under its own weight, so you can measure a full sheet of plywood solo instead of doing that awkward clamp-the-end-under-your-arm move. Stanley’s FatMax tapes are the ones I keep coming back to, honestly, but any big-box brand with a wide blade does the job. Don’t buy the $4 pocket tape. The hook bends, the numbers wear off within a month, and you’ll measure wrong without realizing it. That’s the insidious part.
Next is a 12-inch combination square, which is really three tools wearing a trench coat. It checks 90-degree corners, slides along an edge to scribe a parallel line, and doubles as a depth gauge and a tiny level. You’ll reach for it a dozen times per project, I’d say, for jobs a tape simply can’t do. Add a speed square for 45-degree lines and quick rip guides, plus a mechanical pencil. Once your joints get fussy, step up to a marking knife, because a knife line gives a saw blade a valley to sit in and tear-out drops to nearly nothing.
The Hand Tools That Do the Actual Work
This is the layer people picture when they imagine woodworking, and it’s also where beginners overspend on the wrong things. Keep it boring. A 16-ounce claw hammer with a smooth face covers driving and pulling nails, and the smooth face won’t leave the dimpled smiley marks a milled face leaves on finished trim. When you eventually buy a framing hammer with a milled face, keep it away from anything you care about. Ask me how I know. The little half-moon dents only show up after the first coat of finish, which is a miserable way to meet them.
Then chisels, which are the highest-skill, highest-reward tools on this whole list. A set of four bench chisels, quarter inch through one inch, handles everything a beginner will ask of them, and mid-range sets from any major brand run $25 to $45. They arrive merely sharp-ish, though, and that gap matters. Five minutes on a honing guide with a cheap diamond stone changes everything, and Fine Woodworking has free sharpening guidance that beats anything I could squeeze into a paragraph here. I’d say the hour you spend learning to sharpen pays back on every project for the rest of your life, and I don’t think that’s an exaggeration at all. Chisels also want a wooden or rubber mallet rather than the claw hammer. Hammer steel on chisel steel rings and bruises both, while a mallet drives the cut without the racket. A $12 shop mallet outlasts the habit of grabbing whatever’s closest.
A sharp chisel makes it feel like the wood has decided to agree with you.
The block plane belongs in your apron pocket from week one. Mine has trimmed sticky drawer bottoms, eased every tabletop edge in my house, and fixed about fifty joints that were a hair proud. New ones start around $25, old Stanley 9-1/2s show up at garage sales for less, and either works. For actually cutting wood by hand, skip the big Western push saw at first and buy a Japanese-style pull saw for $25 to $40. Pull saws cut on the pull stroke, which keeps the blade taut, and they need far less muscle to track a straight line. Add a coping saw for curved cuts, which costs about the same as a large pizza and will outlast three of them.
Screwdrivers, a set of files, and a $5 card scraper round things out. The scraper looks like a rectangle of old saw blade, and it smooths figured wood that sandpaper would tear up. You’ll feel silly buying it. Then you’ll use it on something figured and quiet down.
| Tool | What it’s actually for | Typical new price |
|---|---|---|
| 25-ft tape, wide blade | Measuring boards and sheet goods solo | $15–$25 |
| 12-in combination square | Square checks, scribed lines, depth gauge | $15–$35 |
| 16-oz claw hammer | Driving and pulling nails, light tapping | $15–$25 |
| 4 bench chisels + honing guide | Cleaning joints, paring, trimming | $45–$70 |
| Block plane | Edge easing, fit tuning, flush trimming | $25–$60 |
| Japanese pull saw | Crosscuts and rip cuts by hand | $25–$40 |
| Coping saw | Curves and interior cutouts | $12–$20 |
| Card scraper | Smoothing grain that sandpaper tears | $5–$12 |
Clamps: Buy Two More Than Seems Sensible
Wood glue needs pressure until it cures, and your two hands are already busy holding the pieces together. That’s the entire job description of a clamp, and it’s why you’ll own more clamps than any other tool category within two years. Start with six medium F-clamps, two long pipe clamps you can assemble from plumbing pipe, and a handful of cheap spring clamps for holding guides and templates.
You can never have too many clamps. You can only have too few.
Buy used here without worry. Clamps have almost nothing to break, and estate sales sell them by the box. I’ve never met a woodworker who regretted a clamp purchase, and I’ve met plenty who can tell you exactly which project ran short. Mine was a bookshelf in 2019. I still remember the glue-up, and I’d rather not talk about it.
For lengths, think in projects. Six-inch and 12-inch F-clamps cover boxes and small glue-ups, while the pipe clamps exist for tabletops and wide panels, because that’s where a beginner’s glue-up always runs short. Spring clamps live in a coffee can by the bench and hold patterns, templates, and the occasional freshly glued edge. I cut my pipes at four feet and store them in the rafters, and they only come down when a panel does. Nothing more exotic for a long while.
The Three Power Tools Worth Buying First
Budget roughly $200–$250 combined
A cordless drill/driver is the tool you’ll use most in your entire house, not just the shop, so this is the one place I’d push you toward a decent brand even on a tight budget. Any 18- or 20-volt platform works; DEWALT’s 20V line and its cheaper rivals all drive screws and bore holes perfectly well. Get two batteries. Nothing stalls a Saturday project like a single battery charging for two hours while a half-assembled bench sits there judging you.
Second is a random orbital sander. Hand-sanding a tabletop takes an evening you’ll never get back, while a 5-inch random orbital does it in twenty minutes with less dust, because the sanding pad spins and orbits at once so the grit doesn’t leave swirl marks. A decent one runs $50 to $80. Learn grit sequences early; Rockler’s how-to library explains which grits to use at each stage far better than the back of a sandpaper sleeve does. Roughly speaking, you step through the grits instead of jumping over them, and skipping straight to fine paper just polishes your mistakes.
Third is a jigsaw, the cheapest powered way to cut curves and awkward shapes. A $60 jigsaw plus a sharp blade handles everything from scalloped shelf ends to the rough opening for a sink cutout. Is it precise? Not especially. It leaves an edge that wants a few passes with a file or the block plane, and for beginner projects that’s a fair trade. Just buy decent blades, because the one that ships in the box is built to cut anything and excels at nothing, while a $10 pack of wood blades transforms the tool.
One more addition that isn’t glamorous at all, and that’s a shop vacuum. Sanders and saws throw fine dust that settles on every horizontal surface in the garage, and a vacuum hose on the tool’s port catches most of it before it becomes a cleanup weekend. But the bigger reason is finish quality, since dust landing in a wet finish coat is the most common beginner blemish I see in photos people send me. Even a used wet-dry vac with a crevice adapter beats nothing.
The Next Additions, Once Projects Get Ambitious
At some point you’ll want to break down full sheets of plywood or long boards, and that’s when a circular saw earns its shelf. Paired with a $30 straightedge guide or even a clamped level, it cuts straighter than a freehand table saw cut and costs half as much. Mine is a $45 used sidewinder that has built three bookshelves and a garden shed, and the blade guard sticks a little, which I fix with a squirt of dry lube every few months. Don’t overthink this purchase.
And yes, the miter saw belongs in this later tier instead of the starter kit. Once you start cutting repeat-length pieces for trim, frames, or picture ledges, it stops being a dust collector and starts being the fastest tool you own. I’d put a router next. A basic fixed-base router puts rounded-over edges plus dados and rabbets within reach, and those three cuts show up in an enormous share of beginner-friendly furniture plans. Popular Woodworking publishes beginner router technique pieces worth bookmarking before your first pass.
Two non-tool additions matter more than any machine in this section. First, a real workbench with a vise, which I’d strongly suggest building yourself as a first project; Purdue Extension publishes free project plans and shop-safety sheets aimed at exactly this stage. Second, a sharpening station, because every cutting tool in this article performs on the strength of its edge. Nothing else in the shop pays off like sharp does.
Nice-to-Haves You Can Put Off for a Year or Two
A thickness planer is the machine I missed most once my projects outgrew big-box lumber, because rough-sawn boards are cheaper and flatter than anything pre-dimensioned. The planer makes faces parallel and boards an even thickness, which over the course of even one dresser project is the whole difference between drawers that slide on their first try and drawers you plane twice, sand for a weekend, and still shim with cardboard. A jointer flattens one reference face first, and purists will tell you that you need both machines. For a year you can fake the jointer’s job with a planer sled and some patience, which is why the planer comes first on my list. Drill presses, bandsaws, and lathes all live in the same bucket: wonderful machines, zero use for your first bookshelves. Every one of them shows up used for a third of retail, often from shops that are upgrading, so there’s no prize for buying new early. Wait until a project actually demands one, then go used.
What to Skip Entirely (For Now, Maybe Forever)
Pneumatic nail guns plus a compressor sound like a pro move and mostly add a hose to trip over. A hammer sinks the finish nails on beginner projects just fine, and by the time you’re installing actual trim you’ll know exactly which nailer you want. Renting a brad nailer for a single weekend costs less than the compressor ever will. Biscuit joiners and dovetail jigs occupy the same category: machines that solve joinery problems you can handle with glue, clamps, and a chisel for years. The jigs also go stale. The skills don’t.
The pocket-hole jig is the one borderline call. It drills angled holes for hidden screws and assembles face frames and cabinet boxes fast, and plenty of beginners love theirs. I’ve watched it turn into a crutch, though, because every project starts looking like a pocket-hole project once the jig lives on the bench. If you build mostly painted utility furniture, fine, go enjoy it. If you want tight dovetails someday, learn the chisel habits first and treat the jig as a later convenience.
Skip the sub-$200 benchtop table saw, too. The fences flex, the small tops can’t support sheet goods, and the safety geometry is worse than a circular saw with a guide. Save that money toward a quality jobsite saw later, when you’ve proven to yourself you’ll use it. And please walk past the CNC routers and laser engravers for now. They’re fascinating machines, but they answer a question your first-year projects aren’t asking.
The same logic applies to finishes, where beginners tend to buy five cans and use half of one. A single can of oil-based polyurethane, a pack of foam brushes, and some lint-free rags covers almost every beginner project, and Minwax’s finishing guides walk through application and drying times step by step. For project plans and tool reviews while you build out, Woodworker’s Journal has been a reliable free reference for decades, and the workshop guides at Family Handyman are worth a Saturday of reading.
How I’d Spend $350 on a Bare Garage
- Used circular saw, $40. Add a $30 straightedge guide when sheet goods show up.
- Cordless drill/driver, $90. One good battery platform, purchased new with two batteries.
- Random orbital sander, $60. Five-inch pad, dust port hooked to a shop vacuum.
- Layout tools, $40. Wide-blade tape, combination square, speed square, pencils, knife.
- Hand tools, $65. Hammer, four chisels, mallet, honing guide, pull saw, coping saw, card scraper.
- Clamps used, $40. Six F-clamps, two pipe clamps, spring clamps, all secondhand.
- Block plane and safety gear, $35. Glasses, hearing protection, dust masks, and the plane.
That lands around $400 with tax and a sheet of plywood for a bench top, and honestly it stays that honest if you swap the new drill for a used one. The lumber for your first workbench isn’t in the list on purpose. And every dollar above that bare minimum buys either accuracy or safety, the only two things I’d pay early for. Build the bench from construction lumber, make all your mistakes on it, and consider the dents a record of everything you’ve learned since.
Prices are typical US big-box and used-market figures as of October 2026 and will drift a little with sales and seasons. External links go to manufacturers and publishers I’ve found actually useful; none are affiliate links. This guide gets updated when tool lines change or a better budget option appears.
Leave a Reply