A store gift card says “I remembered the date.” A handmade gift says “I thought about you for three weekends.” Here’s my working list of maker projects that genuinely land — engraved boxes, smart lamps, desk organizers, small electronics — plus how to pick the right one for the person, plan backwards from the occasion, and batch-build a whole gift list without losing your mind.
A few years ago I gave my father-in-law a small walnut box with a hand-cut dovetail at each corner and his initials engraved on the lid. The box itself took about six hours spread across two weekends. It has held his cufflinks ever since, and he brings it up more often than any other gift I’ve given him — including ones that cost ten times as much in parts. That asymmetry is the entire argument for making gifts instead of buying them. Effort in, disproportionate gratitude out.
But let’s be honest about the other side, because every maker has lived it too. The scarf nobody wore. The chunky knit hat that came out the wrong shape. The ambitious electronics project that arrived in a bag of loose parts, blinking its error code at the recipient like a cry for help. Handmade gifts fail when the maker picks the project they wanted to build instead of the gift the person wanted to receive. That single mistake explains almost every dud I’ve made, and fixing it is what this whole guide is about.
Below is the approach that’s worked for me across a dozen gift-giving occasions. First, how to pick by the recipient instead of by your own project backlog. Second, how to plan backwards from the date so the finish is actually dry in time. Third, a four-quadrant map that sorts giftable builds by effort versus payoff, so you can match the project to the amount of shop time you honestly have. Then the builds themselves, the finishes and personal touches that make them feel special, and finally the batch-production system I use when the gift list has more than one name on it.
None of this requires a pro shop. Everything here is within reach of a garage bench, a modest 3D printer, and a soldering iron.
In this article
Start With the Person, Not the Project
The rule that saves every gift build
The backlog trap is real. You have a list of builds you’ve been meaning to try, and a gift occasion feels like the perfect excuse to finally make the thing you want to make. Resist it. The recipient’s life should dictate the project, full stop. Before I pick up a single tool, I run through three questions, and I write the answers down because unfixed ideas lie.
First: what does this person actually touch every day? The gifts that get used for years live on desks, nightstands, and kitchen counters. A colleague of mine keeps pens, his phone, and a pair of glasses on the same twelve inches of desk, so a fitted desk organizer was an obvious win for him. My sister-in-law drinks tea every single evening, which made a wooden tea box with divided compartments a better choice than anything electronic I’d have enjoyed building more. Daily-use objects earn permanent shelf space. Decorative objects fight for it.
Second: how much tech does this person actually want? This is where makers most often misread the room. A smart lamp with touch controls and color scenes is a fantastic gift for a teenager or a fellow tinkerer. For your aunt who still prints out her emails, it’s a support contract you just signed. I ask myself a blunt question. When this thing misbehaves — and every electronic thing misbehaves eventually — who will they call? If the answer is me, happily, fine. If the answer is me, grimly, for the next five years, I build wood instead. There’s no shame in a purely analog gift from someone with a full electronics bench. Wood ages; firmware doesn’t.
Third: what do they care about that I can encode in the object? The personal hook is what separates a handmade gift from a craft-fair purchase. Favorite sports team, a line from a wedding reading, the coordinates of a first apartment, a dog’s name, the constellation visible on a particular night. Nearly every build in this guide has a surface somewhere that can carry engraving, a printed medallion, an inlaid accent. Design that spot in from the start, not as an afterthought the night before.
Plan Backwards From the Occasion
Wood glue dries overnight. Oil finishes cure for days or weeks depending on the product. 3D prints fail halfway and have to restart. Electronics have a secret talent for hiding a bad solder joint until final assembly. Every one of those facts gets worse when the deadline is fixed and approaching, and gift deadlines are the most fixed dates in a maker’s life. Nobody accepts “the polyurethane is still tacky” as a reason to move Christmas.
So I plan backwards, in writing, from the day I need to hand the gift over. The math I use is simple and it’s saved me more than once:
- Hand-over day. This is fixed. Write it down.
- Minus one week for finishing. Most oil and wipe-on finishes need a few coats with a day or more between coats, and they keep off-gassing and curing after they feel dry. Finishing is never the stage to compress. If you want to be truly safe with an oil finish, look at a month, not a week.
- Minus build time plus a 50% buffer. Whatever I estimate a build will take, I multiply by 1.5. My estimates are decent after years of this, and the buffer still gets eaten almost every time, usually by a piece of wood that turned out to have a split in exactly the wrong place.
- Minus one weekend for failure. Not a buffer for slowness — a buffer for a complete restart. Prints warp, dovetails blow out, an LED strip arrives dead. One full weekend of slack between “planned finish” and “actual finish” is the difference between a calm build and a panicked one.
For a December holiday, that usually means design work starts in October and lumber gets bought no later than early November. For a June wedding, I’m sketching in April. It sounds absurdly early when you say it out loud. It stops sounding absurd the first time a finish takes a week longer than the can implied.
The Gift Map: Build Effort vs. Payoff
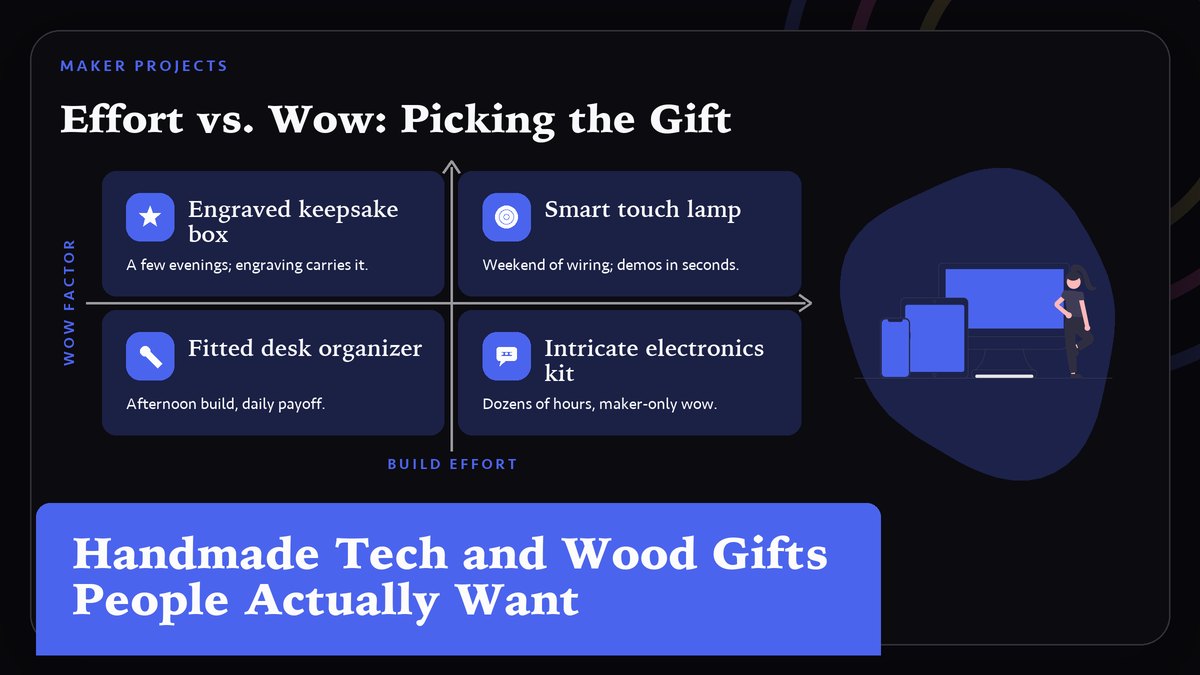
Every giftable build I know sits somewhere on two axes. How much effort it takes, and how much it wows the recipient. That sounds cold-blooded for something as warm as gift giving, but the map keeps you honest about the one resource you can’t buy more of: weekends between now and the occasion. Here’s how the four corners shake out, with a representative build in each.
| Quadrant | What lives there | Build it when |
|---|---|---|
| Low effort, high wow | Laser- or hand-engraved keepsake box, personalized cutting board | Time is short but the occasion matters |
| High effort, high wow | Smart lamp with custom touch controls, walnut and epoxy river piece | You have a month-plus and a recipient who loves tech or fine woodwork |
| Low effort, steady payoff | Simple desk organizer, wooden phone stand, coasters | You want something reliable for coworkers, teachers, extended family |
| High effort, modest wow | Intricate multi-part electronics kits, complex segmented turning | The build itself is the point and the recipient shares your hobby |
The takeaway from the map is simple: aim for the top half. The high-effort, low-payoff quadrant is where good intentions go to die. A finicky electronics kit that took you forty hours will impress exactly one person at the party — you — unless the recipient is a fellow maker who will actually appreciate the internal gearing. For everyone else, the engraved box that took six hours lands harder than the robot that took forty.
One more practical note on the low-effort, high-wow corner, because it’s the most valuable real estate on the map. Engraving is the cheat code. A basic box that would be unremarkable at a craft fair becomes an heirloom the moment it carries a name, a date, and a few words that matter. If you have access to a laser engraver — many libraries and maker spaces now run them — or even a steady hand with a rotary tool and a template, keep a simple box design in your back pocket. It’s the highest return on shop hours I’ve ever found.
Five Builds That Never Miss
The working list I actually keep taped inside my shop cabinet
These are the projects I’ve made more than once, adjusted, and watched people keep using. Each one notes who it’s for and where it tends to go wrong.
The engraved keepsake box
One hardwood board, a handful of dovetails or even simple rabbet joints if you’re newer, a hinged lid, and a felt-lined interior. Six to ten hours of work for a woodworker with a few projects under their belt. The magic is on the lid: a name, a date, a short line of text, engraved or wood-burned. My joinery on the first one was frankly embarrassing — one corner gap you could park a fingernail in — and the recipient never noticed, because the lid carried her grandmother’s handwriting, traced from a scanned recipe card. Nobody has ever inspected my dovetails. Everybody inspects the inscription.
The smart touch lamp
A wooden or 3D-printed base, a microcontroller, an addressable LED strip or ring, and a diffuser. Touch the top to cycle through warm white, colors, and off. For a teenager’s room or a maker-adjacent friend, this is the crowd-pleaser of the electronics world — it demos in two seconds, it looks like something from a design store, and the parts cost less than a decent store-bought lamp. I’ve built three. The failure point is always the same: the diffuser. A cheap print or thin wood veneer with too little light bleed looks harsh. Prototype the light quality early with the actual LEDs and the actual material, in a dark room, before you commit to the enclosure. Prusa’s knowledge base has solid guidance on print settings and materials if you go the printed-route, and it will save you a pile of wasted filament on prototypes.
The fitted desk organizer
Measure the person’s actual desk clutter — pens, phone, glasses, a watch, loose change — and build compartments to fit. Wood, plywood with a nice edge, or a hybrid of a printed insert in a wooden tray. This is the best gift on the list for coworkers and in-laws, because it solves a visible daily problem. The trick that elevates it: fit it to their things, not generic things. Measure their phone with its case on. Ask what pens they actually use. A slot that’s exactly right feels bespoke in a way no store product can.
The small electronics gift
A macro keypad with custom keycaps for the spreadsheet person. A soil-moisture monitor with a cheerful enclosure for the plant obsessive. A simple headphone stand with a hidden USB hub. The rule here is restraint: one function, executed perfectly, beats five functions that half-work. And be realistic about your scope — a single weekend project from the Arduino ecosystem, adapted with a personal twist, is a gift. A from-scratch custom PCB with enclosure is a quarter of your year. If you want a sanity check on a circuit or a cleaner way to read a diagram before you commit, our own guide to reading circuit diagrams is the right starting point, and it pairs well with the soldering basics if your joints are rusty.
The wooden serving or display piece
A cutting board, a cheese board with a juice groove, a small wall shelf for a plant or a trophy. Lower tech, higher finish expectations — this is the one where your sanding and finishing skills are fully on display, because there’s no engraving or gadgetry to carry it. End grain boards are the classic; edge grain with a good chamfer and a food-safe oil finish is the honest weekender. Species choice matters here more than anywhere, for both looks and movement. The Wood Database is the reference I keep open whenever I’m picking a species I’m less familiar with, since it covers hardness, toxicity for food-contact pieces, and how much a wood likes to move with the seasons.
Finishes and Personal Touches That Make It Feel Expensive
Two gifts can leave the same shop with identical joinery, and one reads as precious while the other reads as a school project. The difference is almost always finish and surface feel. People touch handmade things. They run a thumb across the lid, they pick the organizer up. So sand past where you think you’re done — through 220 at minimum, and the backs and undersides too, because people flip things over — and break every sharp edge with a hand-sanded chamfer. A crisp edge feels sharp and cheap; a broken edge feels considered.
On the finish itself, match the product to the use. Food-contact pieces get food-safe mineral oil or a board butter, refreshed with a card telling the recipient how to re-oil it once a season. Display pieces can take almost anything. Keepsake boxes are happiest with a hard-wearing wipe-on finish that cures fully and doesn’t smell like a chemistry lab when the lid opens, because people stick their noses in boxes. Whatever you use, respect it. Oily rags are a genuine fire hazard, since drying oils heat themselves as they cure, and a wadded rag can self-ignite in a corner. Lay them flat to dry or store them in a lidded metal can — the U.S. Fire Administration’s prevention guidance covers oily-rag storage, and it takes one minute to read. And keep the sanding dust under control while you’re at it; fine wood dust is a real respiratory hazard over years of shop evenings, which is why the dust basics matter even on a “small” project.
Then the personal layer. A short handwritten note explaining one choice — why that wood, what the engraving says and why — costs nothing and multiplies the gift’s weight. Tuck it in the box. Every recipient I’ve done this for has mentioned the note before the object.
Batch Production for a Gift List
When the list has five or eight names on it — teachers, coworkers, the whole family — you need a different mode of working. Producing gifts one at a time, start to finish, wastes your setup time eight times over. Batch production is the answer, and it works exactly like it does in a small shop making parts: cut all at once, sand all at once, finish all at once, personalize last.
The workflow that serves me well: pick one design for the batch, maybe two at most. A simple box or a coaster set made eight times teaches you the build so well that by number three you’re faster and better than you were on number one. Mill all the lumber in one session, because a thickness planer that stays set up for an afternoon beats one that’s been put away between pieces. Cut joinery in a batch with a stop block so every piece is identical without measuring twice. Sand assembly-line style, all the flats then all the edges.
Do the personalizing absolutely last, one gift at a time, after the batch is otherwise finished. This is the rule that protects the schedule. If you engrave each box as you go and the engraver is booked or broken in week two, the whole batch stalls. If everything else is done, personalization on a finished blank takes an evening, even at the last minute. Batch the making, serialize the meaning.
And keep a honest tally of parts. When you make one smart lamp, a dead LED strip is an annoyance. When you make four, it’s a quarter of your gifts, so order spares of anything cheap and failure-prone — LEDs, hinges, magnets, felt pads. The extra thirty dollars of spares has never once felt wasted.
The Short Version
Pick the project for the person, not your backlog. Plan backwards from the date with a week of finishing slack and a weekend for failure. Use the map: stay in the high-payoff half, and lean on engraving when time is short. Prototype the light before you build the lamp. Batch the making, serialize the personalizing. And write the note.
My father-in-law’s cufflink box has outlasted three store-bought wallets I gave him before it. That’s the trade this hobby offers you. A handful of evenings in the shop, traded for something a person keeps on their dresser for a decade. Not a bad exchange rate at all.
Sources & references: Arduino Project Hub, Adafruit Learn, Prusa’s knowledge base, the Wood Database, OSHA’s woodworking machinery guidance, and the U.S. Fire Administration’s fire prevention material, all linked above. Related reads on this site: weekend maker projects, how to finish wood projects, soldering for beginners, and 3D-printed workshop organizers. Updated October 2026.