Skip the $40 kit projects from the craft-store shelf. This is the ladder of ten builds I’d hand any beginner, in order, each one picked to drill one core skill before you spend a single dollar on fancy tools.
When I started woodworking I did it backwards: I spent $400 on a miter saw, watched a hundred hours of YouTube, and then built nothing for six months because every project I picked seemed to need a tool I didn’t own yet. What broke the logjam was a friend with a two-car garage full of machines who told me to put the saw down, pick up a handsaw, and build a shelf. An ugly shelf, one so simple it couldn’t fail. That shelf taught me more about measuring and cutting square than any of those hundred hours. If you’re stuck in the same “I don’t have the tools yet” loop, this ladder is the way out: ten builds in a deliberate order, each teaching one skill you’ll use for the rest of your woodworking life, and no fancy tools until project eight at the earliest, which is roughly when you’ll know whether this hobby is really for you.
In this article
- The Whole Ladder at a Glance
- Before You Cut Anything
- Projects 1-3: Hands, Eyes, and the Honest Saw
- Projects 4-6: Assembling Things So They Don’t Wobble
- Projects 7-8: Gluing, Flattening, and Long Cuts
- Projects 9-10: Design, and Putting It All Together
- What to Do When You Get Stuck
- The Tool Upgrade Path, in Order
The Whole Ladder at a Glance
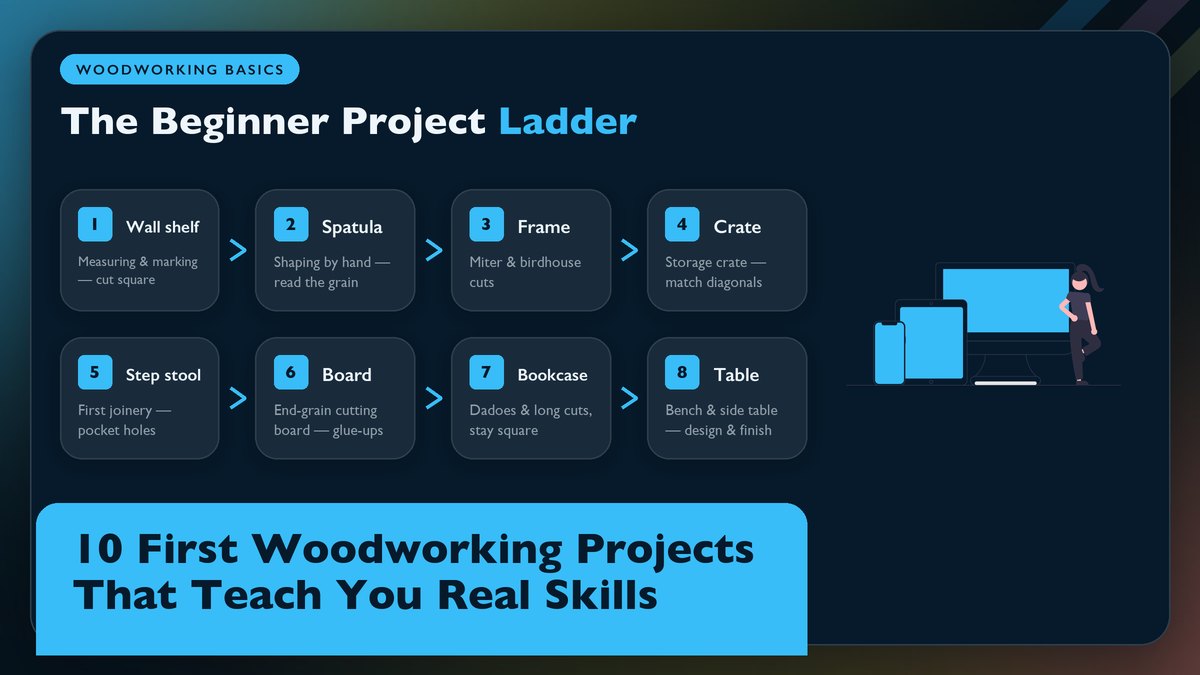
The ladder below runs from an $8 shelf to an $80 table, and every rung teaches exactly one headline skill. Each project builds on everything before it and ends with something useful in your home rather than a practice scrap you throw away. I’ve added a rough lumber cost per project, because “does this fit my budget” is a real question for most beginners.
| # | Project | Core skill it teaches | Lumber cost |
|---|---|---|---|
| 1 | Simple wall shelf | Measuring & marking | $8-15 |
| 2 | Wooden spatula | Shaping by hand | $5-10 |
| 3 | Picture frame | Miter cuts | $10-20 |
| 4 | Birdhouse | Angled cuts & assembly | $10-15 |
| 5 | Storage crate | Squaring a box | $15-25 |
| 6 | Step stool | Your first real joinery | $15-25 |
| 7 | End-grain cutting board | Glue-ups & flattening | $20-40 |
| 8 | Bookcase | Dadoes & long cuts | $40-70 |
| 9 | Two-board bench | Design & proportion | $30-50 |
| 10 | Small side table | Apron joinery, legs & finishing | $50-80 |
Every skill in woodworking is a measuring skill wearing a costume; a shelf that reads 31 inches on the left and 31¼ on the right will tell you the truth about your tape work every single day you walk past it.
Before You Cut Anything
Total starter kit: about $120 if you buy everything new, less used
A 25-foot tape measure, a 12-inch combination square, and a sharp pencil cover the measuring side. Add a Japanese pull saw, around $25, whose thin kerf cuts on the pull stroke and stays on a line far more easily than a western push saw does for most beginners. A 5-inch random-orbit sander, sandpaper from 80 to 220 grit, a cordless drill/driver, a bottle of Titebond II, food-grade mineral oil, and an N95 face mask round out the pile. That usually lands near the $120 figure above, less if you buy used, and there’s no table saw in it, no miter saw, no router, no planer. Those are multipliers you add later, once you know which projects you actually enjoy.
Don’t cheap out on the combination square, because a sloppy one poisons every project after it; a decent model from Stanley costs less than two bad ones that go out of square within a year. If you do buy a power saw later, read the manual and the OSHA guidance on table-saw kickback before your first cut. By federal injury estimates, table saws account for tens of thousands of emergency-room visits a year in the US, and nearly all of them trace back to a handful of predictable mistakes, kickback chief among them.
Projects 1-3: Hands, Eyes, and the Honest Saw
Project 1: A simple wall shelf, or measuring and marking
One 1×8 board, six feet long, cut to the width of a doorway. Sand it to 150 grit, wipe on mineral oil, and hang it on three metal brackets. That’s the whole build, and it sounds insultingly simple because it is: there’s nothing to hide behind, and if the shelf is 31 inches on the left and 31¼ on the right, you will see it every single day. This build teaches the ritual that governs all woodworking. Measure twice, against two different reference edges, because a hook that slips off the board costs you a sixteenth. Mark the line with a pencil held against your combination square rather than freehand. Then cut to the waste side of the line, so the kerf eats into the offcut instead of your keep piece. I still own my first shelf, mostly out of stubbornness. It’s crooked on one end, and I keep it around as a reminder that everyone starts at zero.
Poplar is ideal for this one, usually under $2 a foot, and it sits harder than eastern white pine on the Janka scale, so it sands smooth without the soft spots that make pine frustrating on a first project. You’ll also get your first finishing lesson here, because a coat of oil changes the color more than you’d expect. Test it on a scrap of the same board and let it dry overnight before judging it; my shelf went from pale plank to warm honey in one coat, and since oil dries lighter than it looks when wet, I nearly panicked before it settled.
Project 2: A wooden spatula, or shaping by hand
Cut a spatula blank from a 1-inch-thick scrap of birch and you’re shaping wood by hand, which teaches you what sandpaper never will. You find out how wood wants to be shaped, which usually isn’t how you planned. Cut with the grain and the knife glides off a clean ribbon; cut against it and the blade tears fibers loose. You learn to fair a curve so it looks right rather than measuring right, and you learn how much work a sharp edge actually removes compared with a dull one. All you need is a hatchet or a drawknife if you have one, otherwise a sharp pocket knife and some stubbornness. Mine is birch, slightly too thick, and my wife reaches for it before the store-bought one. The knife marks stay, and after a year of hand-washing they darken nicely.
Project 3: A picture frame, or your first miter
A miter is a 45-degree cut, and a picture frame is four of them that must add up to a perfect rectangle. The frame tolerates no sloppiness, because if any cut is off by a degree the corners gape by a visible amount. Build it with a handsaw and a miter box (about $12) and you’ll feel the cut quality in your hands, since a saw that drifts off the slot shows up as a corner gap you can slide a fingernail into. Glue the corners, clamp the assembly with a strap overnight, and you own something like angled joinery, a skill that shows up in tables and trim work for the rest of your life, and in casework too. Fine Woodworking has solid free plans for a basic frame if you want measured drawings to follow.
Projects 4-6: Assembling Things So They Don’t Wobble
Project 4: A birdhouse, or angled cuts without fear
The pitched roof of a birdhouse, sloping at roughly 30 degrees, introduces you to angled cuts and, more importantly, to cutting parts in matching pairs. The trick that makes everything after it easier is simple: cut one piece, then use it as the template to mark the second. The birdhouse also forgives, because nobody, including the birds, cares if your roof overhang is off by roughly a quarter inch. I built my first one with my daughter on a Saturday morning, spent forty minutes building and two hours painting, and a chickadee moved in that April. If you want better odds of a tenant, a 1⅛-inch entrance hole suits a chickadee while staying too small for most pushier species. A project that ends with a resident songbird does more for your motivation than any single skill on this list.
Project 5: A storage crate, or the flat-square-true trinity
Six boards, a handful of 1¼-inch screws, and an afternoon make a storage crate, and it’s the most important project on this entire list, I’d say. When you assemble it, you learn the difference between flat, square, and true. A board can be perfectly flat and still twist like a propeller. A box can have four perfect sides and still come out a parallelogram if its diagonals don’t match. Building a crate forces you to measure the diagonals corner to corner, shim against twist, and reckon with the fact that a “1×6” is actually ¾ inch by 5½ inches, a leftover from when boards were sold rough and full-dimension. That discovery alone will usually save you a dozen future mistakes, like laying out an interior around six inches when the board gives you five and a half.
Project 6: A step stool, or your first real joinery
A $40 pocket-hole jig ends your reliance on nails and screws alone. A step stool introduces either pocket-hole joinery or simple half-lap joints, and both teach the same lesson: glue plus a mechanical joint is far stronger than a screw driven into end grain, because a glued long-grain joint usually fails in the wood fibers next to the glue line rather than in the glue itself. Family Handyman has beginner-friendly step-stool plans that use exactly this method. Build the stool strong, because someone in your house, probably you carrying something heavy, will stand on it for years. Give the glue a full 24 hours of cure time before the first load, even if the label suggests otherwise. Mine holds up the kitchen sink cabinets as much as it holds people.
The crate test: compare the two corner-to-corner diagonals. On a box whose sides run roughly 24 inches, even ⅛ inch of mismatch means it leans, and the same check squares every cabinet and table you will ever build.
Projects 7-8: Gluing, Flattening, and Long Cuts
Project 7: An end-grain cutting board, or the glue-up
Eight or ten strips of walnut and maple, the classic pairing, get glued edge to edge, then sliced, flipped, and glued again so the end grain faces up. This project teaches panel glue-ups: even glue coverage, clamping hard without starving the joint, and scraping and sanding a glue-squeezed panel flat. It also forces the one non-negotiable safety habit of the shop, which is to never run a random-orbit sander over a board carrying a finish you can’t identify, since sanding unknown old finish throws fine particles into the air and into your lungs. Cut only bare wood. When it’s flat, finish it with food-safe mineral oil, following a product guide like the ones on Minwax’s site, and re-oil it monthly or whenever the surface starts to look chalky. A homemade end-grain board is also the single best gift in a woodworker’s arsenal. I’ve made nine, and recipients treat them like heirlooms.
Project 8: A simple bookcase, or dadoes and long cuts
An eight-foot sheet of plywood and a long 1×12 mark the point where the projects turn furniture-sized, and two new skills arrive together. The first is the dado, a groove cut across a shelf side that the shelf board sits in; dadoes are how real bookcases stay square under a load of hardcovers for decades. You can cut them with a handsaw and chisel, which is slow but satisfying, or this is the moment a compact router earns its place in your shop. The second skill is the long cut, breaking down that eight-foot sheet without the blade wandering, and this is where a circular saw with a straightedge guide comes in. It’s also the first project where a power-saw purchase pays off, and if you go that route, a compact saw from a pro line like DeWalt will serve you for twenty years. Lay out the dadoes with your combination square, cut just proud of the line, and pare down to it with a chisel until the shelf board slides in with a firm push by hand. A shelf that doesn’t rack when you load it is the whole test, and both cuts are learnable in a single weekend.
Projects 9-10: Design, and Putting It All Together
Project 9: A two-board bench, or proportion and design
Two eight-foot slabs of construction lumber, a handful of wedges, maybe four legs. The Scandinavian-style plank bench is where you learn design, because thickness, seat height, and the splay of the legs combine into something that looks inevitable rather than assembled. You decide the length and width, you decide the angle of the legs, and you live with your decisions. I sketched my bench five times on paper before cutting anything, and the version I built is still an inch or so too tall, which taught me to sit on the lumber stack in the store and mock up heights before committing. Most bench and chair seats land around 17 to 18 inches for an average adult, and that one habit, the full-size mockup from cheap material, has saved me more money than every tool I own.
Construction lumber often leaves the store at 15% moisture content or higher, and the bench teaches you what it does next. A long plank will move as it dries, cupping or bowing over a few weeks in a heated house. Learning to flatten a board with your sander and check it against a straightedge, rather than cursing it, is the practical heart of “wood moves,” a fact every serious reference on the craft repeats and every beginner has to feel once to believe.
Project 10: A small side table, or the capstone
Four legs, four aprons, one ¾-inch top, then the finish. The side table is the capstone because it asks for nearly every skill on this list in a single build: accurate measuring, square joinery (pocket holes are fine), a glue-up, dadoes or cleats for the top, thoughtful proportions, and finally a real finish. Sand to 220 grit, wipe off the dust, and apply your chosen finish in thin coats. University extension services like Purdue Extension publish excellent free material on wood species and finishing basics if you want the science behind the can. The first coat will usually look terrifying. The third coat will look like furniture. When you set a lamp on a table you built from raw boards, you’ll understand why people don’t quit this hobby.
What to Do When You Get Stuck
You will mess up, usually within the first inch of a cut. Everyone does, on every project, forever; the pros just mess up less visibly. When a joint gaps or a board splits, resist the urge to hide it immediately and study the failure for five minutes under a raking light. Was the cut off the line, or was the line off the mark? Did the wood split along the grain because you drove a screw inside the last inch of the board without a pilot hole? Woodworking errors are unusually honest, because the wood keeps a perfect record of every decision, and reading that record is the fastest teacher in the shop. Fill the gap with a glue-and-sawdust paste, then note the lesson and move on.
Two habits separate woodworkers who plateau from the ones who keep improving.
A notebook with 20 logged projects beats any website. Keep it in the shop and write down what you did: species, dimensions, glue, finish, drying time. Six months later it’s your personal reference, because nobody else recorded that your oak offcut took three coats where the pine took two. Second, finish things. A project ninety percent done teaches you almost nothing, but a project fully done, finish cured and the piece in use in your home, teaches you what to build next.
The Tool Upgrade Path, in Order
Tool cravings arrive around project 5, when the handsaw starts feeling slow, so here’s the order I’d suggest for adding power tools, based on which project first makes each one useful.
- Random-orbit sander (roughly $60). Buy before project 1. Sanding a shelf by hand at 80 grit takes the fun out of an afternoon, and a 5-inch model does the same work in twenty minutes.
- Cordless drill/driver (about $80). Also before project 1, since it’s the most-used tool in any shop, and the first shelf alone asks for nine bracket screws.
- Circular saw plus straightedge ($100 or so). Around project 5, when boards get long; a 7¼-inch blade guided along a clamped straightedge breaks down a 1×12 without wander.
- Compact router (around $90). At project 8, for dadoes and edge profiles; a small fixed-base model handles both for years.
- Miter saw ($150 and up). After you’ve cut thirty miters by hand and know what a good one feels like. Then it multiplies your speed instead of multiplying your ignorance.
- Table saw (several hundred). Last, and only when the projects demand repeatable rip cuts. Respect it, and read the safety guidance first, every time.
A planer (roughly $400 used), a jointer, a bandsaw, maybe a drill press — all wonderful machines, and none of them are needed for anything on this list. By the time you want them, you’ll usually know exactly why you want them, which is the only good reason to buy a tool. I’m no hand-tool purist. I just think the craving should follow the project instead of running ahead of it.
Prices are typical US big-box lumber costs as of late 2026 and vary by region and species. All external references were checked live before publishing. Build order, tool kit, and safety notes reflect common beginner practice; always follow the safety instructions that ship with your specific tools.