
Good lumber is sitting in dumpsters, behind warehouses, and on curbs all over your town, and most of it is free for the asking. This is a practical walk through the whole reclaimed-wood pipeline: where to find pallets and salvage, how to read the stamp on a pallet so you don’t bring home something toxic, how to pull nails and flatten twisted boards, and which projects are actually worth your weekends.
My first pallet project cost me eleven dollars and most of a Saturday, and I remember the Saturday more clearly than the shelf. I’d spotted a stack of pallets behind a tile shop on my commute, dragged four of them home in the trunk of a sedan that was absolutely not designed for that, and spent the afternoon learning — the hard way, with a pry bar and a lot of colorful language — that pallet slats crack when you’re impatient. The shelf I eventually built was crooked, honest-looking, and still holds my paint cans nine years later. More importantly, that afternoon taught me the whole truth about reclaimed wood, which is that the lumber is the easy part. Everything between “free pallet on a curb” and “flat board in your hands” is where the craft actually lives.
If you’ve spent any time around woodworking content, you’ve seen the highlight reel. Entire kitchens built from pallets, wedding signs, farmhouse tables with a hundred-dollar lumber budget. What those videos skip is the unglamorous middle: sourcing boards that are safe to use, getting thirty ring-shank nails out of oak without splitting it, and milling a board that spent a year outdoors into something square and flat. That middle section is this article. We’ll cover it in order, the same order you’ll work through it, and by the end you’ll know exactly which pallets are worth grabbing, which ones to walk past, and what to do with the boards once you have them.
A quick promise before we start. Nothing here requires a truck, a barn, or a five-figure shop. A sedan, a pry bar, a circular saw, and a little patience cover about ninety percent of what follows.
In this article
Where the Free Lumber Actually Is
The short version: ask small businesses, watch renovation sites, and leave the big-box dumpsters alone
Pallets are the obvious starting point, and they’re everywhere, but not all sources are equal. The best hunting ground, in my experience, is small independent businesses. The tile shop, the masonry yard, the family-run garden center, the local brewery — places that receive goods on pallets but don’t have a pallet-return program with their distributors. Many of them pay to have pallets hauled away, which means you’re doing them a small favor by taking a few. Ask inside, be polite, take only what they offer, and you’ll rarely be told no. I’ve never been turned away when I asked at the counter instead of just grabbing from the stack.
The second source category is renovation and demolition salvage. Kitchen tear-outs produce solid wood cabinets, old shelving, and trim. Deck demolition produces actual dimensional lumber, though much of it will be pressure-treated, which comes with its own rules we’ll get to. Storm cleanup and neighborhood bulk-trash days turn up furniture carcasses with useful hardwood parts — a solid oak table leaf with a busted leg is a stack of free oak boards if you can saw past the damage. Keep an eye on local classified ads and community groups where contractors sometimes list “free wood, come haul it” just to avoid dump fees.
Two sources deserve a warning. Big-box retail dumpsters often technically contain pallets, but the stores usually have contracts with pallet recyclers, so taking them can cross from “friendly salvage” into actual trouble. And railroad pallets, the heavy ones used for machinery, are often pressure-treated with creosote or older preservative chemicals. They’re not worth it for indoor projects. Skip them.
| Source | What you’ll find | Watch out for |
|---|---|---|
| Small shops (tile, masonry, garden, brewery) | Clean-ish hardwood pallets, often free for the asking | Ask first; skip stained or oil-soaked decks |
| Renovation and demo sites | Cabinet-grade panels, trim, solid furniture parts | Lead paint on pre-1978 items — test before sanding |
| Curbside and bulk-trash days | Furniture hardwood, odd solid pieces | Hidden screws and dowels inside “solid” parts |
| Railroad and heavy industrial pallets | Thick, rugged lumber | Creosote and old preservative treatments — skip these |
| Big-box store dumpsters | Pallets, display lumber | Recycling contracts; ask inside or don’t take |
Reading the Pallet Stamp
Every legitimate internationally shipped pallet carries a stamp, usually burned into one of the center blocks or a stringer, sometimes inked on. That little mark tells you how the wood was treated, and this is the single most important check in the whole article. Learn it once and you’ll never wonder again whether a pallet is safe to bring home.
HT: The One You Want
HT stands for heat treated. The pallet was heated to a core temperature of 56 degrees Celsius for at least thirty minutes, which kills insects and larvae without leaving any chemical residue in the wood. Heat-treated pallets are widely considered safe for indoor furniture, wall paneling, cutting boards after proper milling and sealing, and all the usual hobby projects. If the stamp says HT, the pallet is on the “take it” list, assuming it’s clean and not obviously soaked in something.
MB: The One You Walk Away From
MB stands for methyl bromide, a fumigant pesticide that was phased out in much of the world precisely because of its toxicity. Pallets marked MB were gassed with it. You do not want that wood in your living room, your garden soil, or your lungs during a sanding session. The rule is absolute: no MB pallets, no exceptions, no “I’ll seal it and it’ll be fine.” There is always another pallet. Walk away and find an HT one.
You’ll also see a two-letter country code (like US, CA, or DE) telling you where the pallet was treated, plus the IPPC certification mark, which looks like a small ear of corn inside a shield. Those are administrative details. The code that governs your decision is the treatment code. Some pallets carry no stamp at all, which usually means they were built for domestic use and never needed treatment. Unstamped pallets from local manufacturers are a judgment call — for a shop fixture or garage project, fine; for a kitchen table, I’d hold out for a stamped HT pallet so you know what you’ve got.
One more inspection pass before you load up. Flip the pallet over and look at the deck boards. Avoid pallets with dark oily stains, chemical spills, or any board that smells odd — pallets carry everything from motor oil to fish packing, and the smell never fully leaves. Also skip pallets with broken stringers and excessive rot. You’re about to invest hours into these boards, so it pays to be a little picky at the curb instead of stubborn in the shop.
Getting the Hardware Out Without Destroying the Boards
Here’s the part nobody puts in the highlight reel. A typical pallet holds eighty to a hundred ring-shank nails, and ring-shank nails grip like they were poured into the wood. Yank a slat straight up with a crowbar and one of two things happens: the nail head pulls through the board, tearing out a chunk, or the board cracks at a knot. The trick is to stop treating pallet disassembly like demolition and start treating it like surgery.
The tool that changed my salvage life is a pallet pry bar, sometimes called a pallet buster — a long-handled tool with a forked, curved tip designed to slip between the deck board and the stringer and lever the board up evenly along its whole width. The even lift pops the nails out slowly instead of ripping them through. They cost less than a decent hand plane and pay for themselves in saved boards the first weekend. If you’d rather improvise, a wrecking bar plus a short block of scrap wood as a fulcrum under the bar’s curve gets you most of the way there, and a second hammer swung under the lifted board to tap nails back out from below saves countless boards.
For nails that stay stuck after the board is free, work the heads loose with the claw of a hammer and rock them out along the grain. Pliers crush fibers and leave a hole; the claw, used with a shim underneath, pulls along the grain and leaves far less damage. On boards you plan to resaw or run through a planer later, there’s one non-negotiable step we’ll return to in the milling section: find every nail, including the broken-off shanks, before the board ever touches a machine blade.
A word about the nails themselves: don’t burn them out. The common advice to char the nail area and pull the softened wood away works, but it scorches the board, weakens the fibers around the fastener, and on chemically treated lumber puts stuff in the air you don’t want in your lungs. Mechanical removal is slower and better. Slow is the theme of this whole article, honestly. Reclaimed wood rewards patience and punishes hurry.
Milling Rough Boards Flat (the Part That Makes It Furniture)
Freshly pried pallet boards are a long way from project-ready. They’re cupped, twisted, checked, and studded with fastener damage. Turning that into flat stock follows a fixed sequence, and the sequence matters because each machine fixes one kind of problem. Skip a step and the next machine just makes the mess more precise.
Step one is flattening one face, and for most hobby shops that means a jointer or a planer with a flattening sled. You can’t feed a twisted board through a thickness planer and expect the planer to fix the twist — the rollers just press the twist flat for a moment, and the planer planes that temporarily-flat shape, springing back into twist the moment it exits. So one face gets flattened first, by hand plane, by jointer, or on a sled. Only then does the planer do its real job: making the opposite face parallel at an even thickness. If you’re new to this machine, the machine guarding guidance from OSHA is written for professionals but the physics and the hand-placement habits apply to a garage shop just as well.
Step two, before any of that happens, is metal detection. Run a rare-earth magnet or, better, a cheap stud-finder-style metal detector over every face of every board, including the ends. Pallet slats hide broken nail shanks in the interior of the wood, invisible from every surface, and a carbide planer knife hitting one doesn’t just nick the blade — it can turn a chunk of hardened steel into a projectile and ruin a hundred-dollar cutterhead. This is the single most-skipped step in reclaimed milling, and the single most expensive one to skip.
Step three is working around the character. Reclaimed boards carry nail holes, old bolt holes, weather checks, and stain lines, and the honest approach is design around them rather than sand them away. A row of nail holes along the edge of a board is a story. Lay out your parts so the interesting scars land where they read as features, and save the cleanest faces for the surfaces people actually touch. I keep a “character” pile and a “clean” pile after milling, and projects get better the moment I stopped trying to make every board look new.
Two practical notes on thickness. Pallet deck boards are usually thin, a half inch to five-eighths before milling, and you can easily plane away a quarter of that chasing flatness. Be conservative. And if your boards are too thin or too cupped for machines, remember that plenty of great reclaimed projects — planters, shop jigs, rustic shelves — only need one flattened face, which a hand plane handles in twenty minutes without a single machine.
Honest Projects Worth Your Weekends
Chosen for what reclaimed lumber is actually good at: character, thickness, and tolerance for rustic
Not every project suits reclaimed wood, and I’d rather be straight with you than hand you a fantasy list. Reclaimed stock is inconsistent in thickness, riddled with fastener holes, and often narrow. Projects that embrace those traits succeed. Projects that fight them turn into frustration. Here are the three categories that work, from easiest to most ambitious.
Shelves and Wall Storage
The gateway project, and for good reason. Shelves tolerate varied board widths, don’t need four perfectly square corners, and put the wood’s scars front and center where they read as charm rather than damage. A pair of pallet boards across three brackets is an afternoon’s work and looks genuinely good. Push a little further and you get French cleat systems — a wall of interchangeable holders and shelves hung on beveled strips of reclaimed plywood — which turned my own garage wall from clutter pile into the most photographed corner of my shop. The boards’ old nail holes are perfect for hanging pegs and hooks straight through, no drilling required.
Planters and Outdoor Pieces
Outdoor use forgives almost everything. Slightly cupped boards, mixed widths, leftover stain lines — none of it matters once the planter is holding dirt on a porch. Build a simple slatted box with a cedar or landscape-fabric liner, because you don’t want old pallet wood in direct contact with potting soil you’ll grow food in, and because the liner buys the whole box years of life. Raised garden beds follow the same logic at larger scale, and this is where I should repeat the rule from earlier: HT pallets only, never MB, never creosote-treated railroad ties. If you want the deep dive on which species and treatments cause reactions, the Wood Database’s article on wood allergies and toxicity is the reference I keep bookmarked.
Shop Fixtures and Jigs
This is the secret best use of reclaimed lumber, and the one experienced makers lean on hardest. Your shop doesn’t need furniture-grade finishes — it needs a sturdy workbench top, a miter saw station, a lumber rack, clamp holders, and jigs that you’ll beat up anyway. Reclaimed two-by material, stringers, and thick deck boards are often harder and denser than modern construction lumber because they came from old-growth trees, which makes them outstanding for bench tops and fixture frames. My sharpening station, my rolling tool cart, and the frame of my assembly table are all reclaimed, and if I dropped any of them, I’d rebuild from the same pallet pile without hesitation.
What I’d avoid as a first reclaimed project: dining tables with breadboard ends, anything requiring long glue-ups of perfectly matched color, and cutting boards. That last one surprises people, but food-contact surfaces demand wood you can identify and trust, tight grain with no old fastener holes, and a finish protocol that reclaimed stock fights every step of. Shelves first. Shop fixtures second. The heirloom furniture can wait until you and the lumber have an understanding.
Finishing Old Wood Safely
Old wood finishes differently than new, and the first reason is the one that matters most: you don’t always know what’s on it or in it. Any salvage from before 1978 might carry lead paint, and “might” is doing heavy lifting in that sentence. If a piece of salvage has layers of old paint, test it before you sand — lead test swabs are cheap and take a minute, and the EPA’s lead information pages explain exactly why dust from old paint is not a risk to take casually. If it tests positive, you don’t necessarily have to throw the wood away, but you do have to change the plan. No dry sanding, ever. Hand-plane or wet-strip the paint outdoors with proper cleanup, or relegate that piece to the scrap pile where the risk ends.
The second reason is dust. Reclaimed wood dust is the same fine-particulate hazard as any wood dust, with the added unknowns of whatever the wood absorbed over its working life, plus decades of embedded grit that dulls sandpaper at a shocking rate. Sand outdoors or with extraction and a respirator, and let the dust-collection habits from basic shop safety carry over here unchanged. The Power Tool Institute publishes safety material covering sanders, saws, and dust practices from the manufacturers’ side, and it’s a solid companion read if reclaimed milling will be a regular activity for you.
The third reason is finish choice. Old wood takes stain unpredictably — patches of the board that lived a different life absorb differently and blotch — so test any stain on an offcut first. My honest preference for most reclaimed projects is a clear oil or hardwax-oil finish that deepens the color and protects the surface while letting the wear marks show through, or a wipe-on polyurethane for pieces that need real water resistance, like planters. Skip thick film finishes that attempt to make old wood look new; they fail at exactly that and the attempt looks worse than the honest patina ever would.
And the fire rule, because it’s the one that sends garages up in smoke: rags soaked in oil-based finishes dry by oxidation, which generates heat, and a pile of them in the trash can self-ignite hours after you’ve gone to bed. The U.S. Fire Administration’s home fire prevention guidance and the NFPA’s fire extinguisher guidance both cover this in plain language, and the fix costs nothing. Lay oily rags flat outdoors to dry, or store them in a lidded metal can. An old coffee tin by the finishing bench has saved more than a few shops.
The Whole Pipeline on One Screen
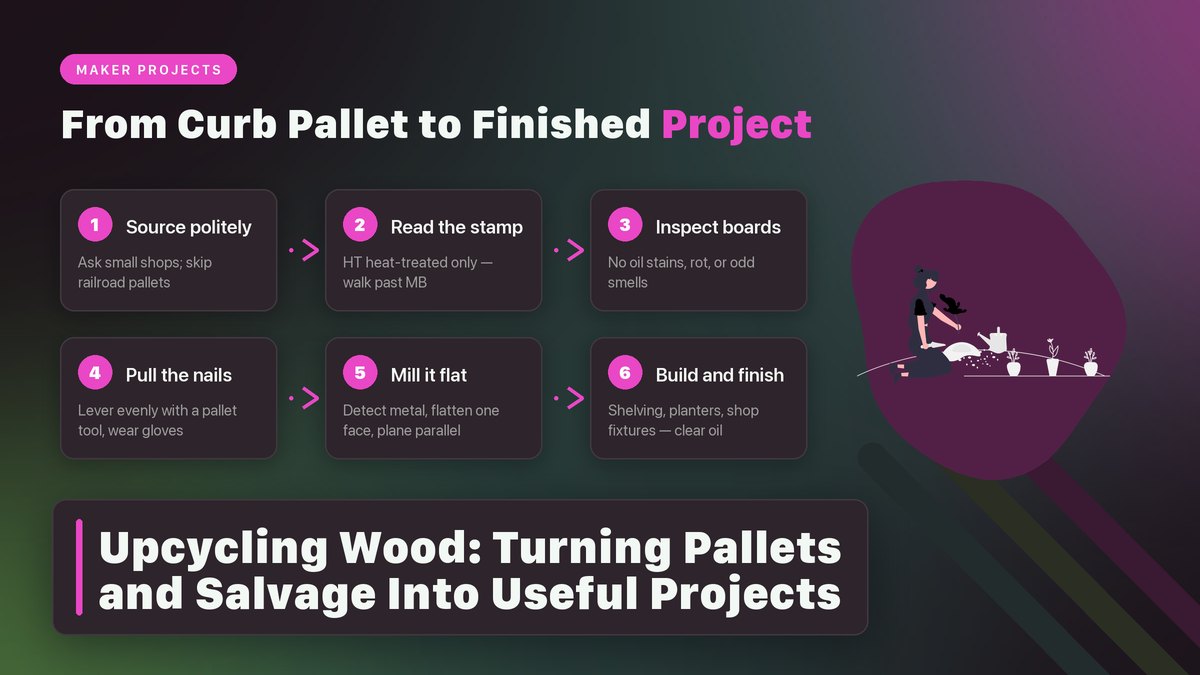
Here’s the entire article compressed into the sequence you’ll actually follow, from curb to clear coat. Print it, tape it near the pallet pile:
- Source politely. Ask small businesses; skip big-box dumpsters and railroad pallets.
- Check the stamp. HT only. MB and creosote-treated stay on the pile.
- Inspect the boards. No oil stains, no odd smells, no rotted stringers.
- Disassemble with a pallet tool. Lever evenly, pull nails along the grain, wear gloves.
- Detect metal twice. Magnet over every face, including ends, before any machine.
- Mill in order. Flatten one face, then plane to thickness, then square an edge.
- Sort by character. Clean pile for touch surfaces, scarred pile for shop and garden.
- Test before finishing. Lead swab old paint; test stains on an offcut.
- Finish honestly. Clear oil or wipe-on poly; lay oily rags flat or use a metal can.
The deeper I get into this hobby, the more my favorite pieces are the reclaimed ones, and not because they were free. A board that spent decades as part of a shipping network or a farmhouse floor arrives in my shop carrying marks that no new lumber will ever have. My job is just to make it flat, keep it honest, and give it a second working life doing something it’ll be proud of. Yours too, starting with one pallet and one weekend.
Sources & references: the Wood Database on wood allergies and toxicity, OSHA’s machine guarding guidance, the EPA’s lead information pages, the U.S. Fire Administration and the NFPA on fire prevention, and the Power Tool Institute’s safety material, all linked above. Related reads on this site: the essential beginner tool kit, finishing wood projects, workshop safety habits, and small workshop layout ideas for fitting a salvage pile into a small shop. Updated October 2026.