Your first finished project is a coin flip. Either it comes out smooth and rich, or it’s a blotchy, sticky mess that no amount of sanding seems to fix. The difference almost never comes down to talent. It comes down to three things nobody bothers to tell beginners: which grit to stop sanding at, when wood conditioner actually matters, and which finish matches the piece you’re making.
The first thing I ever finished was a pine bookshelf I built in a weekend, mostly out of one-by-twelves from the home center. I slapped on a coat of dark walnut stain straight from the can, waited an hour, and brushed on whatever polyurethane was sitting in the garage. The next morning the shelf looked like someone had spilled coffee on it. Dark, greasy patches around the knots, pale streaks along the edges, and a top coat that stayed tacky to the touch, like it would never quite dry. I ran my hand across it and thought, I built this thing square and true, and the finish wrecked it.
That bookshelf taught me the most important lesson in beginner woodworking. Construction is only half the project. Finishing is a skill of its own, with its own vocabulary, its own tools, and its own failure modes. Mercifully, it’s a small skill. Maybe a dozen decisions to learn, and once you know them, every can on the hardware store shelf slots into place. This guide walks through the three big ideas (sanding grits, blotching, finish types) and then turns all of it into a simple set of questions you can run on any future project.
What a Finish Actually Does
Before the how, ten seconds on the why. Raw wood is a bundle of microscopic tubes. Left unfinished, those tubes drink up every fingerprint, every drop of spilled coffee, every ring from a wet glass. They swell and shrink with humidity too, which is what makes bare wood crack and gray over time. A finish seals those tubes shut.
But a finish does two jobs, and beginners usually only think of one. Job one is protection, a physical barrier between the wood and everything daily life throws at it, from water rings to grimy handprints. Job two is looks: color, depth, sheen, that warm glow people associate with “real” furniture. Some finishes are built far more for one job than the other, and that tension is the whole reason the finish aisle is so confusing. Every can on the shelf is a different compromise between protecting the wood and beautifying it. Keep that in mind as we go.
Sanding Grits, Demystified
The most common beginner mistake: skipping from 120 straight to stain.
Sandpaper numbers confuse everyone at first, because a bigger number means a finer paper. Grit is just the count of abrasive particles per inch. Roughly, ignoring all the grits that only floor refinishers and professionals ever touch, the spectrum you’ll actually use on furniture projects looks like this:
- 80 grit. Aggressive material removal. Shaping edges, flattening glue lines, erasing mistakes. Leaves deep scratches, so never your final grit.
- 120 grit. The workhorse for “smooth to the hand.” Fine for painting and paint-grade parts, still too coarse for most clear finishes.
- 150–180 grit. The sweet spot before stain or clear finish on most softwoods and hardwoods. Most of your final sanding should happen here.
- 220 grit. The classic final grit before a clear coat on hardwoods. Go finer than this and the surface actually gets too slick for some finishes to grip well.
- 320 grit and up. Used between coats of finish, not on bare wood. You knock down dust nibs and brush marks with it.
Move up through the grits in steps, never skipping more than about one grade. I wish someone had tattooed that on my forearm, because each grit’s job is to erase the scratch pattern of the one before it, and skipping just polishes the old scratches into little mirrors.
And dust matters more than grit. Vacuum the piece or wipe it down with a tack cloth when you think you’re done, because a single grain of coarse dust left on the surface gets dragged across your final pass and scratches it, and you won’t find the scratch until an hour after your last coat of finish has gone on and hardened. Ask me how I know.
You don’t need a garage full of machines for this. A quarter-sheet palm sander (the DeWalt and Stanley catalogs are full of solid options under $70) handles big surfaces, but a sanding block with a quarter sheet of paper gives you more control on edges and small parts. Machine or hand, sand with the grain on your final passes. Cross-grain scratches are the ones that telegraph through finish from across the room.
The Blotching Problem (and the Conditioner Fix)
Remember my coffee-stained bookshelf? That was blotching, and it’s the most common finishing disaster beginners run into. Some woods, pine, fir, poplar, cherry, maple, absorb liquid stain unevenly because their grain density swings wildly from one millimeter to the next. Dense areas stay pale while spongy areas soak up pigment and go nearly black. Oak and ash behave better. Their open, uniform pores take stain evenly almost no matter what you do, which is half the reason every magazine project seems to be red oak. The editors are dodging the blotch too. So test everything on a scrap first. Pine does not forgive, and neither does cherry, and the blotch always seems to land in the worst possible spot, right in the middle of the most visible panel you spent all afternoon flattening.
You’ve got three ways to fight it:
- Wood conditioner. A thin sealer, Minwax’s Pre-Stain Wood Conditioner being the classic, sold right beside their stain line. Brush it on, wait 15 to 30 minutes, wipe off the excess, then stain over it. It partially seals the thirsty spots so the whole board absorbs color at a similar rate. On pine and soft maple, the difference is night and day.
- Gel stain. A thick, pudding-like stain that sits on the surface instead of diving into the pores. Far more forgiving on blotch-prone wood, and it doubles as a light glaze over an existing finish.
- Sneak up on the color. Skip penetrating stain entirely and build color with thin dye coats or a tinted topcoat. More work, total control.
Finish is the one phase of a project where the scrap pile pays rent. Test every finish decision on an offcut before it touches the real piece.
I test on scraps religiously now, because “conditioner plus stain” isn’t a magic formula. It changes the color. Conditioned pine takes stain lighter and a little duller than raw pine, which once sent me back to the store for a darker can when my “special walnut” came out looking like weak tea. One scrap board split in half, conditioner on one side and bare on the other, would have told me the whole story in ten minutes.
The Main Finish Types
Now the part everyone actually searches for, what’s inside those cans. Four families cover ninety percent of what a beginner will ever need, even though the aisle offers more than that.
1. Penetrating oil finishes (boiled linseed oil, pure tung oil)
The old-school choice. Wipe on a thin coat, let it soak in, wipe off everything that hasn’t absorbed, repeat tomorrow. Oil cures inside the wood rather than on top of it, so the surface feels like wood: warm, matte, no plastic film. The trade-off is protection. Oil finishes resist water poorly and offer almost no scratch armor. I love them for tool handles, display pieces, anything that will be admired more than used. A quart of boiled linseed oil runs about $12 to $16.
2. Wipe-on poly and Danish oil (the hybrids)
These split the difference. Wipe-on polyurethane is regular poly thinned with mineral spirits so it goes on with a rag instead of a brush. Danish oil blends oil and varnish, giving you an oil-like feel with modest film protection. Both are nearly foolproof. No brush marks, self-leveling, nearly impossible to lay on too thick. For a first-ever project, a can of wipe-on poly ($14 to $20) is the friendliest thing in the store.
3. Brushed polyurethane (oil-based and water-based)
The armor of the finish world. Polyurethane is a plastic film that sits on top of the wood and shrugs off water rings and toy cars. Oil-based poly adds an amber warmth as it ages, the classic “antique” look, but it takes 8+ hours between coats, yellows over light woods, and cleans up with mineral spirits. Water-based poly dries in a couple of hours, stays crystal clear, cleans up with water, and barely smells. It needs an extra coat or two to match oil’s build, and the first coat can raise the grain, which is exactly why the water-pop trick from earlier matters. For anything that will see hard use, tabletops, desks, kids’ stuff, this is the answer.
4. Shellac and paste wax (the specialists)
Shellac is the ancient, alcohol-based finish that dries in an hour, smells faintly sweet, and polishes to a glow. Restorers reach for it on antiques, and finishers use it as a universal sealer coat because almost nothing has adhesion problems over shellac. You can seal knots and oily exotic woods with it before anything else goes on. Paste wax isn’t protection at all. It’s a final silky top layer over shellac, lacquer, or even poly, beautiful to touch and zero defense against a coffee mug. Treat both as tools for specific jobs rather than general finishes. Fine Woodworking’s finishing archive is the rabbit hole I’d send you down when you’re ready to go deeper on these two.
The Comparison Table
| Finish | Look & feel | Protection | Drying time | Beginner forgiveness |
|---|---|---|---|---|
| Penetrating oil (linseed/tung) | Matte, warm, feels like bare wood | Low — water spots easily | 24+ hrs per coat | Very high — wipe on, wipe off |
| Wipe-on poly / Danish oil | Soft sheen, slight warmth | Moderate | 4–8 hrs per coat | Highest — nearly impossible to mess up |
| Oil-based polyurethane | Amber, glowing, plastic-smooth film | Excellent | 8–12 hrs per coat | Moderate — brush marks and bubbles possible |
| Water-based polyurethane | Clear, modern, low sheen options | Excellent | 2–4 hrs per coat | Moderate — grain raise, fast drying |
| Shellac | Deep glow, polishes beautifully | Low–moderate | 1 hr per coat | High, but alcohol spills ruin it |
| Paste wax | Silky sheen | None — sacrificial layer | 30 min | Very high — buff and go |
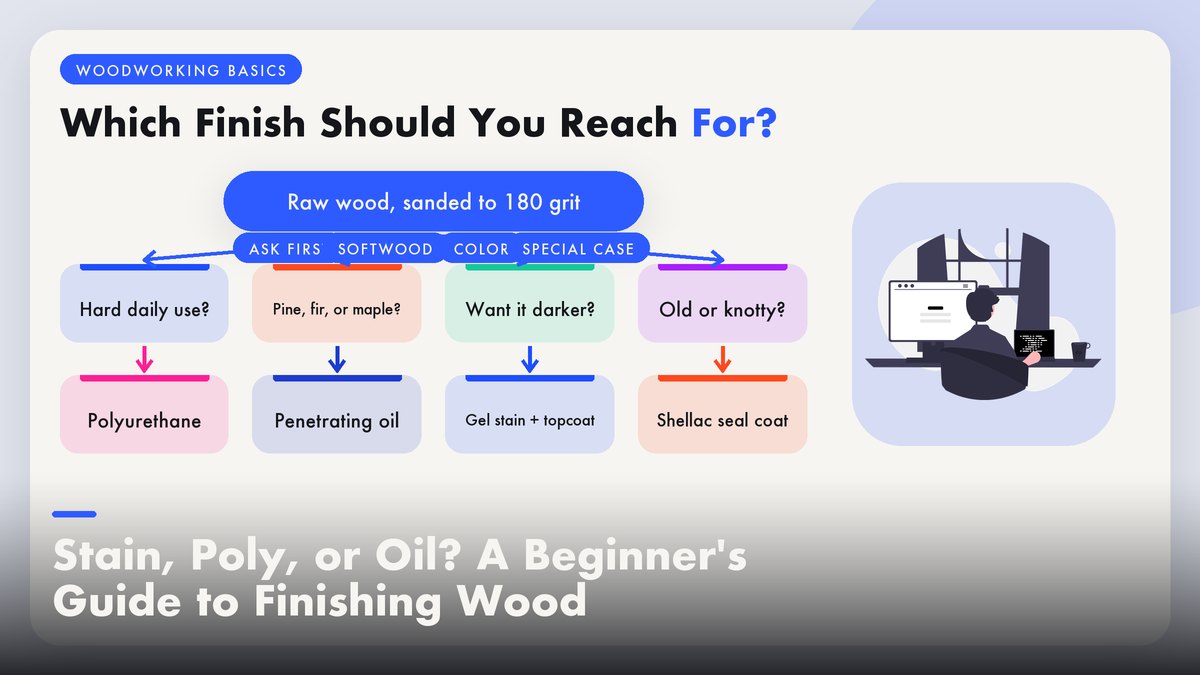
The Decision Flow: Which Finish for This Project?
The whole guide compresses into the questions I now run through in the aisle, can in hand:
- Will this thing get used hard? Coffee tables, desks, anything a toddler can reach, all of it points to brushed polyurethane, water-based if you want clear and fast or oil-based if you want that amber warmth in the wood.
- Is it a look-at-it piece? Display shelves, picture frames, a carved box, that kind of thing? Go with penetrating oil or Danish oil here, because the application is the easiest in the craft and the results are gorgeous.
- Working with pine, fir, poplar, cherry, or maple and want it darker? Conditioner first, or skip straight to gel stain, then a poly topcoat if the piece needs armor.
- Do you hate sanding between coats? Wipe-on poly. Three thin coats, a light scuff only if dust lands in it, and you’re done.
- Refinishing something old, or sealing knotty wood? Shellac first, then whatever topcoat the piece calls for.
That flow covers nearly everything a beginner builds. When you’re staring at a shelf of cans and your brain freezes, Family Handyman’s wood finishing tips and the finishing section at Popular Woodworking are the two references I send people to most. Both are full of practical, shop-tested advice that never goes out of date.
The Mistakes That Ruin Finishes (and How to Dodge Them)
Five ways I have personally wrecked a finish, so you can skip them:
- Shaking the can instead of stirring. Polyurethane bubbles when you shake it, and those bubbles land in the film and stay there. Stir slowly from the bottom. Same goes for stain, since pigment settles and the last thing you coat from a shaken can can come out a different color than the first.
- Coats too thick. A flood of finish looks faster. It isn’t. Thick coats run. They sag. They trap dust and stay tacky for days, and no amount of waiting saves them because the skin on top keeps the solvent underneath soft. Three or four thin coats beat one heroic coat every time. When in doubt, use less than you think you need.
- Sanding the final coat, ever. Only sand between coats, with 320 grit and a light touch. Always wipe the dust off with a tack cloth before the next coat goes on. If the last coat picks up dust nibs anyway, a gentle rub with 0000 steel wool followed by paste wax hides them nicely.
- Rushing recoat windows. Every can lists a recoat time. Respect it, and also respect the longer full-cure time, usually a week or two, before you stack books on that shelf or park a lamp on that table. Water-based poly feels dry in hours, yet stays soft enough to dent for days.
- Treating oily rags as garbage. This one is a genuine fire hazard, not a quality issue. As finishes like boiled linseed oil dry, they generate heat, and a wadded-up rag can self-ignite in your trash can hours later. Lay rags flat to dry outdoors, or soak them in water and bin them in a sealed metal container. OSHA’s woodworking guidance covers the shop safety basics and is worth every beginner’s ten minutes.
A Starter Kit for Under $75
You don’t need to buy the whole aisle. This handful covers a year of projects:
- Wood conditioner (~$10). Only needed if you’re staining softwood, but you will stain softwood.
- One gel or oil-based stain in a medium-dark color (~$12). A single color learned well beats six cans of guesswork.
- Wipe-on polyurethane, satin (~$16). Your default topcoat for almost everything.
- Brushed water-based poly, satin (~$20). For pieces that need real armor.
- 120, 150, 180, and 220 grit paper plus a foam sanding block (~$15). A sheet of each and you’ll sand like a pro.
- Lint-free rags and a tack cloth (~$5). Old cotton t-shirts work. Keep a bag of them.
Total: about $78, and most of it lasts through a dozen projects. Compare that with what you just spent two weekends shaping out of lumber, and finishing stops feeling like an afterthought. It’s cheap insurance on the part of the project you already invested the most in.
My bookshelf eventually got sanded back to bare wood. 180 grit, conditioner, a lighter gel stain, three coats of wipe-on poly. It isn’t perfect. There’s a faint dry patch near one knot that I could probably fix if I were the kind of person who enjoys sanding cured finish. But it sits in my office today, holding actual books, and visitors touch the top and say “you made this?” The difference between the ruined version and this one came down to about $25 in supplies and a Saturday of following the rules above. That’s the real secret of finishing. It isn’t talent, it’s sequence.
Disclosure & sources: This guide draws on the product lines of Minwax, general shop-safety guidance from OSHA, and finishing references from Fine Woodworking and Popular Woodworking, plus Family Handyman, all linked above and checked at publication. Prices are typical US big-box figures as of October 2026 and vary by region. Updated when products or guidance change.